Well comic con 2015 has passed and I feel like it was a success! This year I got to share comic con with both my girls and my friend Erika. It was all there first cons. Sophia and Erika went with me to the Alamo City comic con in San Antonio sept 12 and then added my youngest and we all went to the WizardWorld comic con in Austin. Both were fun and everyone had a good time! But I'm not going to go into that, what people want to hear is how I made our costumes.

Alamo city with my oldest
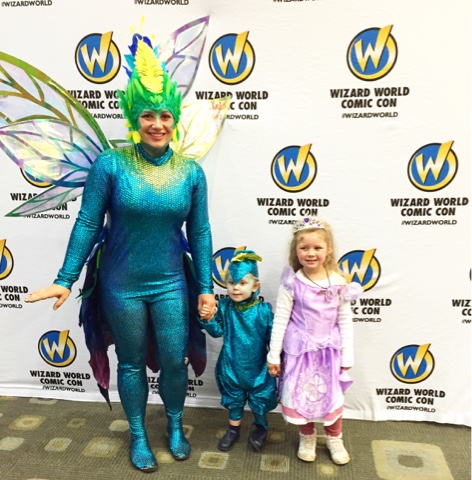
Wizard world with both my girls... Notice baby tooth switched lol


Me and Erika
Let's start with the the fabric. I bought my fabric from spandex house online. They were great! They sent me a sample of the fabric I wanted for free which helped me confirm what I wanted for sure. I think I got like 4 or 5 yards. I was making two costumes and I wanted to leave room for error.
I started on my daughters baby tooth costume. I sketched my idea for her outfit and then took measurements.

Her headpiece turned out pretty good!


Her body suit on the other hand I mis-measured. This first attempt had her waist at her but..oops!

I remeasured exactly where I wanted her waist to start and made a new template.

This time it worked!

Sophia wearing the bodysuit for the first time!

Next I worked on my Toothiana Headpiece. With the advise of some online tutorials I came up with a mixture of several different ways. I started by using foil to form to my head and then secured it with blue painters tape. I then added the side flaps that I would eventually use to put my ear feathers. I then took it off and put on a foam head.


Next Sophia and I did paper mache to form the head piece. It was a fun activity that we got to do together! Once dried I was able to try it on and it fit perfect!

The next step for the headpiece was spray painting the newspaper. Once dried, I got to work on the meticulous activity of hot gluing every single feather to it! I got the feathers on Amazon for a cheap price. Here for the blues, Here for the Green and here for the yellow The big yellow center feather is actually a fake palm branch i got at hobby lobby that i spray painted and cut to look like a father. works pretty good since it's already wired!

The body suit was a bit daunting. I wanted to make a suit that didn't have a team down the middle, but all the patterns I found all had the seam down the middle!! So I improvised. I bought a quick sew pattern here and doubled one side to make it the front and did what they said for the rest. It was a bit crazy but it ended up looking pretty awesome! I decided to enclose the feet which I ended up cutting soles out of some old shoes and hot glueing them to the bottom of the leotard feet. Worked perfect and I didn't have to walk around without foot support.
Next step for the body suit was individually painting each scale yellow green or blue to match the coloring of Toothiana. I used iridescent fabric paint for the yellow and the green and blue were acrylic paint I bought at Hobby Lobby. It took several days to complete but it turned out pretty awesome!

Now back to Baby Tooth costume. I needed to make a giant coin and belt along with tail feathers for her, but at the same time, I know my daughter and needed to make something that could be easily dismantled for potty breaks or just because. I made the belt out of scrap leatherette fabric from a previous project and attached it with a Buckle like This. I actually got them at Walmart cheaper than on amazon.
The tail feathers are just 3 fake palm stems from Hobby lobby that I spray painted blue and attached them to Velcro which I also hot glued to the under side of her belt buckle.
The coin is just a white foam disc that i glued foil to and spray painted gold. I then attached the rope like how it looked in the movie.
We ended up losing the nose and adding another yellow palm feather to her head. The nose was too much of a nuisance for the 4 year old!

Tail feathers. Glorious Tailfeathers. This was a labor of love. I searched and searched and SEARCHED everywhere for freaking tutorials on tail feathers and came up with so LITTLE!! I actually put these off till almost last because I had no idea how to go about it. AND THEN I FOUND THIS!!!! Praise you Jesus it was an answer to prayer! lol This genius used muslin fabric that she stiffened, sewed a wire in the middle, cut out and then painted. So that's exactly what I did. Took me two nights and i was so happy!
I pinned them to my body form for placement, then I hand sewed each feather to a velcro strip. on the body suit I created a flap that the feather strip would velcro under so it looked seamless. I ended going back after and hot gluing pieces of my body suit fabric to make it look more seamless since there was such a harsh line between fabric and feathers on the first go around.

The last part of the costume are the wings. Again I had to research the heck out of this. I have never made anything like this before so i went back and forth on how I was to do it. What I landed on was a technique using poster board and iridescent wrapping paper. I found this really cool iridescent green and blue poster boards at hobby Lobby. I used Loctite Adhesive spray and sprayed together 3 poster boards. I then cut out the veins for 3 different sizes of wings.
Since I needed the wings to go into a harness, I used a wired hanger that I cut and hot glued individual pieces to each top side of the wings. I then ripped the colored part of the poster board and hot glued it over the wire to disguise it.
Then I intertwined all three wing wires together and wrapped them with floral tape to secure them together.

Then the iridescent wrap. I used two different kinds. I bout Fantasy film from an online company here which were better quality but way more costly thant the $3.99 a roll I got at Hobby lobby. In my opinion get the cheap stuff. lol I sprayed the front and back of the wing veins with the loctite spray again and pressed the wrap on both sides. I then irons on a lowered iron setting to seal the wings.

Now i had to attach them to something! Again, I have never done this before and at this point I needed to not spend anymore money on this project according to the hubs ;) So I used an old nursing bra, the left over velcro, the tube from the wire hanger and after a few failed attempts, two pints stir sticks! Who knew?! The picture below show the progress. I sewed velcro to the inside of my bra strap. I then WRONGLY glued the matching vellum to the middle of the tubes. NO NO NO don't do that. I didn't realize how heavy my wings were and need counter balance to keep them from falling over! That's where the paint stir sticks come in! I moved the velcro to the tops of the tube so that they stick down out of the bottom of my bra. Then I used wood glue ( over a 24 hr period) to glue the sticks to the tubes. The last picture show the correct way it should look.

Then I just put the suit over the harness and had my hubby cut two holier the suit for the wings to slip into the tubes. BINGO!

Makeup! The fun part! I bought my lashes here and my body paint here Both worked beautifully!

In order for me to get the clean sharp line on my nose though, I ended up using scotch tape that i positions at the edge of my eyebrow to the middle of my nose. I did this for both sides and then filled in the space with the face paint. Once dried i removed the tape and there was a nice clean line :)
For the sides of my face i just used a paint brush and hand drew the line. I eyeballed it!


The last little final touch I did was make a tooth box that could carry my phone, keys, credit card and id in. I went to the dollar store and bought the cylinder styled gift box they sell there. I then spray painted the whole thing gold. Then I found online some google images of jack's face and the diamond design. I printed it out on card stock. My printer is craptastic, so I ended up painting and using colored pencils to go back over the design. I used the spray adhesive again to attach it to the box and then i took brads that I cut the ends off of and hot glued them around the edge for that little extra Ooph!
And there you have it! Hope you enjoyed reading this as much as I enjoyed making it! It was a blast and Im glad i did it! I had fun and both my girls ended up getting a kid out of being baby tooth!
OH AND I GOT TO MEET MICHAEL ROOKER!!! That was cool :)


